July 24, 2015

Christmas In July Embossed Card for CropStop

Hi! Today I am sharing a Christmas in July embossed card I made for the CropStop. I admit it I usually wait until the last minute to make my Christmas cards and then end up not having enough time to do them. So this year I decided to start early, really early!


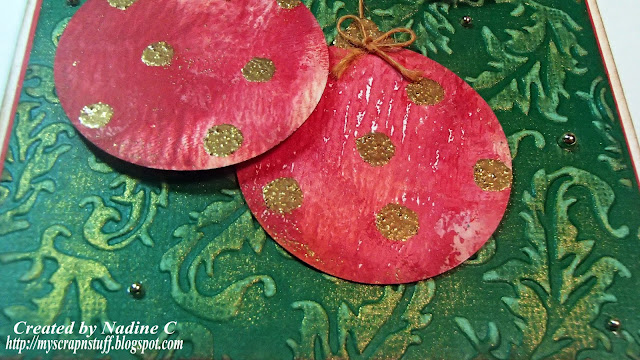
The first thing I did was apply some red and white acrylic paint onto a Gelli Arts Plate and spread it around with a brayer and then pressing a piece of white cardstock onto it. Using Gelli Plates is a fun way to create different textures and designs. Once the paint was dry, I used a punch to create the ornaments. I then used some gold embossing powder on the ornaments to add the polka dots and the top of the ornaments.


On a piece of green Core'dinations Cardstock, I embossed it with the Couture Creations Tickle Me Feathers Embossing Folder. I then lightly sanded the embossed areas and then with my finger I applied some gold ink onto the embossed areas. Then using some burlap string I tied little bows for the ornaments and on the hangers for the ornaments. Added some bling and viola, I have a Christmas in July embossed card! One card down many more to go!


Thank you for looking and I hope I inspired you to give it a try! Be sure to check out the CropStop Shop to find all the supplies to create this project and so much more!

July 20, 2015

Sweet Memories With You Layout

A cute Easter layout I made back in April of my daughter for Scrap n' Art magazine using products from Heartfelt Creations and some of our other sponsors.


I love using Heartfelt Creations dies and stamps to create my own flowers for cards and layouts.


This was my first time using the Imagine Crafts/Tsukineko Creative Mediums and wow! I used them with a stencil and check out the iridescent shimmer they add to your page. 


Supply List: Heartfelt Creations®: Die-cuts: “Botanical Wings”; Paper: “Majestic Morning”; Stamps: “Botanical Rose”; Tools: "Paper Shaping Tools," "Paper Blossoms Molding Mat”; Adhesives: Beacon AdhesivesZip Dry”, Love My TapesDouble sided adhesive tape 33' length tape runners”; Embellishments: Paperbilities “Mini Bunny Accent”; Ink: Imagine Crafts/TsukinekoVersaFine: Majestic Blue”, Imagine Crafts/TsukinekoVersaMark: Clear”; Mixed Media: Imagine Crafts/TsukinekoCreative Medium:Purple”, “Fireworks!: Pear Tart”; Prima Marketing IncArt Basics - 3D Gloss Gel”, “Art Basics - Heavy Gesso: White”, 13arts “Ayeeda Powder 3D Glass Filler Microspheres”, Art Glitter “Gala Glitz: White”, Faber-Castell “Gelatos: Pink, Yellow”, Stampendous “Stamp-n Stuff Embossing Powder: Sunny Yellow Pastel”; Paper: Bazzill “Cardstock: White”; Stamps: Studio G “Series 6”; Stickers: Stampendous “Class a’ Peel Stickers Easter Egg Waves: Pink”; Tools: Imagine Crafts/TsukinekoCraft Mat”, Spellbinders®Grand Calibur® machine (GC-200)”, Westcott® “Tools: Imagine Crafts/TsukinekoCraft MatWestcott® Craft Self Healing Cutting Mat, 12" x 18", Pink and Purple”, “Westcott® Craft Hobby Knife with 5 Assorted Blades, Pink”, “Paper Trimmer: TrimAir® Titanium 12” Wide (Pink)”; The Crafters Workshop “12x12 Stencil”; Miscellaneous: Paintbrush, spatula

July 18, 2015

Embossing Folder Fun with CropStop

Hi, Scrappy Friends! Today I have some embossing folder fun to share with you. I love to make cards using embossing folders, and the CropStop Shop has a huge selection of embossing folders. The one I used on my Happy Birthday card is the Couture Creations Chiaro Serenity Collection.


After embossing a piece of white cardstock, I rubbed some Tim Holtz Distress Ink in Mustard Seed and Forest Moss over the raised areas. Then sprayed with some water to get the inks to bleed and run together slightly. I then used a heat gun to dry after I got the look I wanted.


Then over the raised embossed areas I applied a really thin coat of Prima Texture Paste Platinum Crackle. I then embellished with some Petaloo White Jeweled Flowers and some Yellow Organdy Swirls Ribbon and Scrappers Floss in Sunshine. Now it is your turn to create some embossing folder 
fun!


Thank you for looking and I hope I inspired you to give it a try! Be sure to check out the CropStop Shop to find all the supplies to create this project and so much more!

July 17, 2015

Love Life Layout

Hello! Sharing a layout I created for the July challenge over at Creative Embellishments. The challenge was to use the provided picture as my inspiration and a sketch from Sketchabilities with a twist to use something made of wood. I used some wood butterflies I found in my stash. The inspiration picture made me think of this picture of my Grandmother sitting in front of a water mill and the flowers. The red flowers and blue sky inspired my color theme.


I love these flourish chipboard pieces by Creative Embellishments that I used. I cut one of the flourishes up into smaller pieces and applied some StazOn Studio Glaze in St. Valentine over them and on the wood butterflies.  I used the Studio Glaze in Emerald City over the title pieces.


On the background, I used lots of Gesso, modeling paste with a Prima stencil. Sprayed with Tattered Angels Glimmer Mist in Ruby Slippers and water. For the papers I used My Minds Eye Now & Then Dorothy and Simple Stories Homespun and Petaloo flowers.


 The picture and sketch that I used for inspiration.

Beautiful Layout for My Scraps & More Sketches

Happy Friday everyone! There is a new sketch up over at My Scraps & More Sketches, sketch #110 by guest sketch designer Juliana Michaels.
I used this beautiful picture of my mom for my layout.


I decorated some Creative Embellishments Rings For So Many Things with Gesso, spray mist, and embossing powders. I also used lots of Prima Flowers, Heavy Gesso, Modeling Paste, Color Bloom Spray Mist in Ginger Coral, Smooch Spritz in Gold Glow and 13arts Ayeeda Powder Fine Grained Grit in Faded Pink on my page.


The gorgeous papers I used are from the Prima Debutante Collection & Lemon Craft House of Roses Collection.


Hope you all play along with us over at My Scraps & More Sketches! Here is the awesome sketch I used for my inspiration:


July 16, 2015

Pillow Box Shaker & Video

I got this cute pillow box from The Little Blue House and decided to make it into a fun shaker. The paper I used is from the Jillibean Soup Saffron Yellow Collection.


To see how I created this pillow box shaker, watch my video tutorial....


Make sure to check out The Little Blue House blog for even more inspiration on what to do with these cute pillow boxes.

July 13, 2015

Masculine Picture Frame for CropStop

Hello, everyone! Today I am going to show you how I made this really cool masculine picture frame using fun products from the CropStop Shop.  I started with a simple wooden frame and turned it into this:


The first thing I did was paint the wooden frame with yellow acrylic paint that I mixed some Distress Spray in Fossilized Amber in with it.
Masculine Picture Frame
Once the paint was dry I then stamped the frame with Prima Art Basics Soft Matte Gel and the Heartfelt Creations Cogs and Gears Stamp Set. Before the gel dried I quickly added Cosmic Shimmer Gemstone Gilding Flakes.  These flakes are so cool and can be used so many different ways.
After making sure the stamped gel areas were good and covered I used a dry paint brush to gently brush away the excess flakes.
Masculine Picture Frame
To finish off the frame I added some metal gears from idea-ology and then added more Prima Texture Paste in Copper Crackle and Cosmic Shimmer Gemstone Gilding Flakes to the gears. Sprayed some of the Distress Spray in Fossilized Amber randomly in spots and added a chipboard title that I sprayed and the crackle paste to. Added some Black Burlap String to the outside edges of the frame, attached a picture of my handsome dad in high school and that's it. A super cool masculine frame for that special guy!


Thank you for looking and I hope I inspired you to give it a try! Be sure to check out the CropStop Shop to find all the supplies to create this project and so much more!

July 8, 2015

Heartfelt Card and Video for Scrap n' Art Magazine

Hello! I love Heartfelt Creations dies and coordinating stamps! So I was super excited when they sponsored us over at Scrap n' Art magazine. Here is a card and a video of the process of me making this pretty card.


This is the 1st video I have ever made. Hope you enjoy it!


July 7, 2015

Adventure Mixed Media Layout for The Little Blue House

Hello, Scrappy Friends! Today I am sharing with you a mixed media layout I created using Jillibean Soup Saffron Yellow Pepper Soup Collection and different mediums from Prima Marketing available in The Little Blue House Store.


Supplies needed:

Jillibean Soup Saffron Yellow Pepper Soup Collection
Prima Marketing Art Basics - Clear Gesso, Modeling Paste, and Heavy Gesso White
Various Spray Inks
Stencils
Chipboard Banner
Twine
Buttons
Distress Ink Black Soot
Flower Stamp
Black Marker
3D Foam Adhesives
Other Adhesives
Scissors, Paper Trimmer, Distress Tool, Spatula

1. On a piece of Bazzill Vanilla Cardstock, I spread some Clear Gesso randomly onto it and then dry. This creates a seal so when spraying ink sprays onto the cardstock, it doesn't just absorb into the paper and wick. I like to randomly spray the inks and then spray lightly with water so I can make the inks run down the paper over the gesso. This technique will only work if sealed with the Clear Gesso first.

Once the spray inks are dry, I then used some modeling paste with different stencils and then stamped with a flower stamp dipped in a spray ink that I let run down the page.


2. Distress and layered up papers from the Jillibean Soup Saffron Yellow Pepper Soup Collection. On some chipboard banner pieces, I painted some Heavy Gesso on them, dried and then sprayed with some spray inks. Inked up the edges with Distress Ink Black Soot and used some 3D foam adhesives on the banner and behind my pictures. Flicked some watered down Heavy Gesso and black ink onto the page and adhered some buttons. Outlined my pictures with a black marker and around some of the stenciled circles onto the background.


All done! I ended up with a fun mixed media layout with lots of texture. Make sure to check out The Little Blue House Blog for even more inspiration.
Thank you for looking and happy crafting!