September 24, 2015

September 22, 2015

Forever Daddy's Girl

Hi, everyone! Sharing a layout I made for Scrap n' Art magazine back in June of a picture of my dad and I. I had tons of fun getting crazy with lots of mixed media products to create a grunge look.


To create the "forever" letters I used some old chipboard alphas, painted the bottom of them with black paint and stamped the letters onto my page. 


Supply List:

Adhesive: Beacon AdhesivesZip Dry”, Scrapbook Adhesives by 3L®Crafty Power Tape - 20’ in Dispenser”; Die-Cuts: Spellbinders®Nestabilities®: Sprightly Sprockets"; Embellishments: Idea-ology "Film Strip Ribbon", Prima "Time Traveler's Memories- Tags and Tickets", "Time Traveler's Memories 3x4" ATC Card Pad"; Ink: Imagine Crafts/TsukinekoStazOn: Ivory Black”; Mixed Media: Imagine Crafts/TsukinekoirRESISTible: Tuxedo Black", Prima "Art Basics - Modeling Paste", "Art Extravagance- Texture Paste - Copper Crackle", Ranger "Acrylic Paint Dabber: Pitch Black", Tattered Angels "Gimmer Mist: Black Magic, Cinnamon, Iridescent Gold, Ruby Slippers, Tattered Leather"; Paper: Prima "Cartographer", "Stationer's Desk", "Time Traveler's Memories", Authentique "Aboard", Basic Grey "Blush"; Ribbon/fibers: May Arts Ribbon "1mm Waxed Cord"; Stamps:7gypsies "Distressed Background Stamp", Unity Stamp Co. "Chicken Wire Background"; Stickers: Adorn-it "Tiny Letters: Black"; Tools: Tim Holtz "Mini Stapler", Imagine Crafts/TsukinekoCraft Mat”, Westcott®Westcott® Craft Titanium Non Stick Scissors with Microtip, 5", Pink”, Westcott®Westcott® TrimAir Titanium Paper Trimmer with Ruler, 12", Violet

September 16, 2015

Autumn Splendor Card for CropStop

Hello, today I'm sharing an autumn splendor card I made for the CropStop.

Have you tried the Gelli Arts Gel Printing Plates yet? I love them and are super easy to use! Just dab some acrylic paints onto the Gelli Plate and spread it out using a brayer. Lay a piece of paper over the plate and pull back off like I have below.


Once the paint was dried, I punched out a bunch of little leaves. The yellow, red, green and brown paints I used made the perfect autumn leaves.  I embossed the white piece of cardstock with the Craft Concepts Tall Trees Embossing Folder and lightly inked over the embossed areas. Then adhered the leaves and some Cosmic Shimmer Gemstone Gilding Flakes with Prima Art Basics Soft Matte Gel Transparent.


Thank you for looking, and I hope I inspired you to give it a try! Be sure to check out the CropStop Shop to find all the supplies to create this project and so much more!

September 15, 2015

What to do with those left over alphas!

If you are anything like me, then you have a ton a leftover alphas from sets. I don't like to throw them away, so they just sit there waiting and waiting to be someday used.
I was talking to a friend of mine, and she was trying to find those ABC's that so many of us had as kids on the fridge for her daughter. Then the light bulb went off! I could use up all those chipboard alphas that I had laying around by gluing them onto these super cool Magnetic Craft Sheets that I got from Deflecto Crafts.


I love these #5901CR-Magnetic Craft Sheets 8"x15". They are so easy to work with and to cut with a craft knife. To see more Deflecto Craft products and to find where you can purchase them, click HERE.


Thank you for looking and make sure to check out the Deflecto Facebook page for even more inspiration from the other design team members.

September 13, 2015

C'est Magnifique September Kit Reveal

Hey, everyone! Today I am sharing my first projects for C'est Magnifique using the September Main Kit. This kit was so much fun to work with and perfect for doing lots of fussy cutting!
For my first project, I created this selfie page of me last year on a cruise.

From my stash: Watercolor paints and color mists.
 Using the cute ribbon in the kit I created these shabby chic flowers.


For this page, I used a picture of my daughter on the same cruise vacation that I took of me above.

From my stash: Cheese Cloth, Gesso, Color Mists, Inks, Flower Stamps, die cuts and black cardstock.
I created these flowers using one of the papers from the kit and a stamp and die set from my stash.


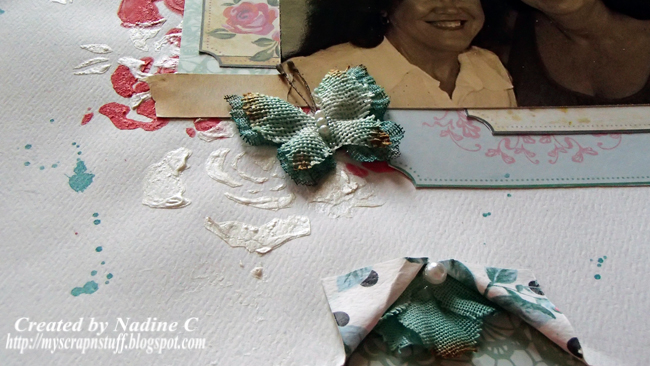
I love this picture of my mom and her sister that I used for this next layout.

From my stash: Pastes, Prima stencil and color mists.


For my last layout, I use an adorable picture of my daughter with her feet in my moms koi pond and with her dog.

From my stash: Prima stencil, color mists, embossing powder and pink cardstock.


For my final project, I created these two pretty hello cards.

From my stash: White, mint green and black cardstock, die cuts and color mists.
I created this pretty flower using the lace trim from the kit.


I created all of this with this gorgeous September C'est Magnifique kit!!


Thank you for looking, and I hope you were inspired. To see all of the C'est Magnifique Kits click HERE. For even more inspiration, head on over to the C'est Magnifique Blog to see what the other design team members have created using this beautiful kit.

Happy crafting!

September 10, 2015

Decorating Acrylic Crafts Frames

Hello, Crafty Friends! Today I am sharing my first Design Team project for Deflecto.  Deflecto is a creator of craft organizational storage, frames and event display products.
For this project, I used their #799593CR-Beveled Edge Frame 5" x 7". To see more Deflecto Craft products and to find where you can purchase them, click HERE.  With the holidays coming, decorating these acrylic craft frames would make great gifts for family members, teachers or anyone you need a quick and simple gift for.


These frames are so much fun to work with. The pegs in the corners screw together to hold the two acrylic pieces together and also to allow you to use thicker papers or embellishments between them if you wish.  I added some bling gems to the ends of the pegs.


To create the red starburst effect on the frame, I airbrushed over a stencil with a Copic marker. I love the looks of it behind the picture of my daughter.  On the outside of the frame, I adhered some shabby chic fabric flowers and 3D stickers.


Thank you for looking and make sure to check out the Deflecto Facebook page for even more inspiration from the other design team members.

September 2, 2015

Some things are just better strong......

Hello, everyone! I'm here again today to show you how I did this fun card and embossing technique of a card I made for CropStop. My husband brought home this really cool metal tape to fix a dryer vent. Once I saw it, I couldn't wait to get ahold of it because I knew that the Wire Barbs Embossing Folder from Couture Creations would be perfect for it.

The quote on the card says, "Some things are just better strong; coffee, men and the button on my jeans!"  The coffee stamp and quote stamp are from Skipping Stone Design.


I covered a piece of cardstock with the metal tape and then embossed it with the Wire Barbs Embossing Folder. I reversed the folder, so the embossing was indented into the foil instead of popping out. Once embossed I mixed some black acrylic paint with some Art Basics 3D Gloss Gel Transparent from Prima and with my finger rubbed into over the top of the embossed foil.


Before it dried, I quickly rubbed the gel off with a paper towel from the smooth surface only leaving the gel inside of the embossed areas.


I did some heat embossing with black embossing powder and Versamark using the Fence Vintage Vanity Clear Stamp by Prima. Flicked some watered down Viva Decor Inka-Gold in Orange to give it a rust effect and then wrapped some burlap string in black around it. I then embellished the card with some flowers I made from ribbon and brads and some super cute tiny clothes pins from Kaisercraft.

Here are some close up pictures of my completed card.


Thank you for looking, and I hope I inspired you to give it a try! Be sure to check out the CropStop Shop to find all the supplies to create this project and so much more!