Showing posts with label StyleTechCraft. Show all posts

August 4, 2022

Handprint Jeep Stickers

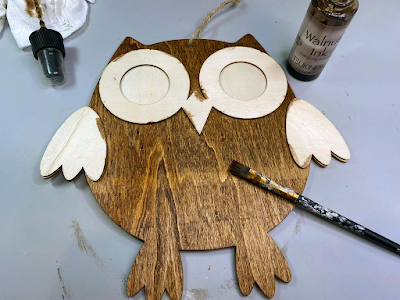
 My daughter got a Jeep and has been having fun customizing it. She wanted these handprint stickers to go on the side view mirrors. She showed me what she wanted, and I said, "I can do that," so I did.

Some of the products I have used in this post have been provided to me by various companies. The opinions I share are solely my own. Affiliate links may be used where possible at no cost to you. However, I do earn a small commission when you click on my link and make a purchase from them. Thank you, and I appreciate your support!

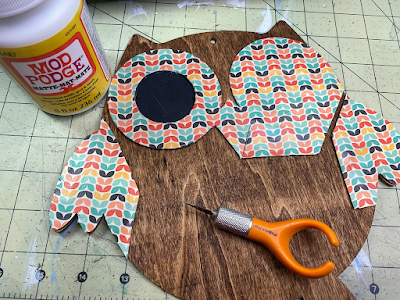
I first found the color of StyleTechCraft Glossy Vinyl in Pink Fluorescent, which my daughter liked, and found the image that she liked too. Then using my Silhouette Studio Designer and my Silhouette Cameo 4 to cut it out using the glossy vinyl settings. Once it was cut out, I weeded it using the StyleTechCraft Tools and layered it on a piece of StyleTechCraft Clear Grid Transfer Tape.

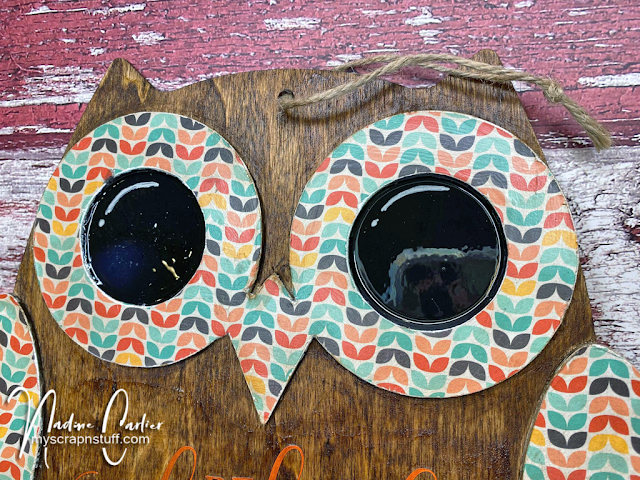
Then I peeled the backing off and applied it to the side view mirror. Using the StyleTechCraft Blue Felt Squeegee, I rubbed over the top of the transfer tape to make sure the sticker was flat with no bubbles. Then carefully pulled the transfer tape off, leaving the image on the mirror.

Here is what it looks like on both mirrors. So fun! If you look closely at the windshield, you can see where my daughter used the little Jeep that was part of the pieces I weeded out from the handprint.


Interested in the products I used? For your convenience, products that are still available are linked to multiple shops below. Lists may contain affiliate links where possible at no additional cost to you whatsoever. Affiliate and product disclosure can be found here.
I design for several companies because I genuinely love their products! Anything I recommend on my blog is something that I genuinely love and regularly use. I buy most of my own supplies. However, I do receive some free products to work with, and I sometimes make money for the projects I make. I DO NOT get paid for product reviews, I give my honest opinion about the products I use, and I will never recommend a product that I do not like or would not use.

January 6, 2022

DIY Sunflower Suncatcher

 Hello! Even though it seems like Winter has just started I am ready for Spring. I like Winter but don't like being cold. So I decided to add a little sunshine or should I say Sunflower into my home with this DIY Sunflower Suncatcher.

Some of the products I have used in this post have been provided to me by various companies. The opinions I share are solely my own. Affiliate links may be used where possible at no cost to you. However, I do earn a small commission when you click on my link and make a purchase from them. Thank you, and I appreciate your support!

I first found a sunflower SVG file at the Silhouette Design Store that I liked and sized it using the Silhouette Design Studio. Then I found the perfect StyleTechCraft Transparent Vinyl colors in Sunflower and Brown. Then I cut the sunflower and word out using my Silhouette Cameo 4.


To transfer the image to the acrylic sheet, I used the StyleTechCraft Clear Grid Transfer Tape to help me line up all the pieces.


Here is what it looks like hanging in the window.


Interested in the products I used? Products that are still available are linked to multiple shops below, for your convenience. Lists may contain affiliate links where possible at no cost to you, what so ever. Affiliate and product disclosure can be found here.
I design for several companies because I genuinely love their products! Anything I recommend on my blog is something that I genuinely love and regularly use. I buy most of my own supplies. However, I do receive some free products to work with, and I sometimes make money for the projects I make. I DO NOT get paid for product reviews, I give my honest opinion about the products I use, and I will never recommend a product that I do not like or would not use.

November 3, 2021

DIY Gift Card Holder Bags

Hello! Do you like giving gift cards as presents for Christmas? They seem to be a popular gift in my family and in order to not lose them under the tree I like to hang them on my tree.


Some of the products I have used in this post have been provided to me by various companies. The opinions I share are solely my own. Affiliate links may be used where possible at no cost to you. However, I do earn a small commission when you click on my links and make a purchase from them. Thank you, and I appreciate your support!

Have you seen the Gwen Studios Die Cut Christmas Ribbons at Walmart yet? They are so cute and can be used in so many different ways. I used the ribbon to decorate mini brown bags to turn them into gift cardholders. Because of the handles, they can easily be hung on your tree or mantle.

I ran the ribbon through my Xyron X Sticker Maker which is the perfect adhesive for the intricate die cut ribbons.

I also used random dies to die cut out some shapes and words using StyleTechCraft Ultra Metallic Glitter Craft Vinyl in Red, Green, Fluorescent Blue, and Silver.

Interested in the products I used? Products that are still available are linked to multiple shops below, for your convenience.
Lists may contain affiliate links where possible at no cost to you, what so ever. Affiliate and product disclosure can be found here.
I design for several companies because I genuinely love their products! Anything I recommend on my blog is something that I genuinely love and regularly use. I buy most of my own supplies. However, I do receive some free products to work with, and I sometimes make money for the projects I make. I DO NOT get paid for product reviews, I give my honest opinion about the products I use, and I will never recommend a product that I do not like or would not use.

October 5, 2021

DIY Thankful Autumn Owl Decor

 Hello and happy October! I think October is one of my favorite months of the year, mostly because I love Autumn. To help kick off the season, I made this adorable Thankful Autumn Owl decor that can be hung on a door, window or you can even just have it stand up on a shelf.

Some of the products I have used in this post have been provided to me by various companies. The opinions I share are solely my own. Affiliate links may be used where possible at no cost to you. However, I do earn a small commission when you click on my links and make a purchase from them. Thank you, and I appreciate your support!

I was at the Dollar Tree and saw this cute owl that I had to get, I mean it was only a dollar so why not.
So I first started by painting the owl with some Walnut Stain.


Next, I painted the center of his eyes black and painted on some Mod Podge on outer circles of his eyes, beak, and wings. Then added some patterned paper to adhere to the Mod Podge. Once it was dry, I used a craft knife and cut the paper to the raised areas of the owl. Then lightly sanded the edges of the paper just to clean up some of my cutting and painted another coat of the Mod Podge over the top of the entire owl.


Then from the Silhouette Store, I found the Be Thankful cut file I wanted to use and the StyleTechCraft Vinyl I wanted to use and cut it out using my Silhouette Studio Designer Software and Silhouette Cameo 4. I used the setting for glossy vinyl to cut the StyleTech Vinyl Orange Luster and then decided I wanted to add a little more color so cut the branch from the cut file in StyleTechCraft Vinyl Teal Luster. I love the finish of the Luster Vinyls, they have a satin look to them. To transfer the vinyl onto the owl, I used StyleTechCraft Transfer Tape.


To finish off the eyes, I added some white around the eyes and then filled them in with some Mod Podge Dimensional Magic to give them some gloss.


Interested in the products I used? Products that are still available are linked to multiple shops below, for your convenience.
Lists may contain affiliate links where possible at no cost to you, what so ever. Affiliate and product disclosure can be found here.
I design for several companies because I genuinely love their products! Anything I recommend on my blog is something that I genuinely love and regularly use. I buy most of my own supplies. However, I do receive some free products to work with, and I sometimes make money for the projects I make. I DO NOT get paid for product reviews, I give my honest opinion about the products I use, and I will never recommend a product that I do not like or would not use.

September 7, 2021

Halloween Decor

Halloween is going to be here sooner than we know it and I have started on my Halloween decorations for around the house.

Some of the products I have used in this post have been provided to me by various companies. The opinions I share are solely my own. Affiliate links may be used where possible at no cost to you. However, I do earn a small commission when you click on my links and make a purchase from them. Thank you, and I appreciate your support!

I started with an old piece of wood that we had in the backyard and cut it into three pieces. Then painted it black with some The Crafter's Workshop Gesso in Matte Black and sanded the edges of the pieces to distress them slightly, then adhered them all together.


For the words, I used StyleTechCraft Glossy Vinyl in White and Orange and cut them out using my Silhouette Cameo 4 and Silhouette Studio Designer Software. I love how well StyleTechCraft Vinyl cuts and how easy it is to weed. Next, I used the StyleTechCraft Transfer Tape and transferred the words onto the wood pieces. Super easy to do and the vinyl stuck to the gesso and wood perfectly!

Then I added some embellishments and wrapped some twine around the stack of books. Placed them on a shelf for a fun Halloween decor piece.


Interested in the products I used? Products that are still available are linked to multiple shops below, for your convenience.
Lists may contain affiliate links where possible at no cost to you, what so ever. Affiliate and product disclosure can be found here.
I design for several companies because I genuinely love their products! Anything I recommend on my blog is something that I genuinely love and regularly use. I buy most of my own supplies. However, I do receive some free products to work with, and I sometimes make money for the projects I make. I DO NOT get paid for product reviews, I give my honest opinion about the products I use, and I will never recommend a product that I do not like or would not use.

August 6, 2021

Quick Way To Customize Battery Operated Candles

I have had these battery-operated candles for a while now and thought it would be fun to decorate them for the seasons.

Some of the products I have used in this post have been provided to me by various companies. The opinions I share are solely my own. Affiliate links may be used where possible at no cost to you. However, I do earn a small commission when you click on my links and make a purchase from them. Thank you, and I appreciate your support!

To decorate my candles, I used some Fall Leaves Dies from Maker's Movement and die-cut them out of some StyleTechCraft Gold Chrome Craft Vinyl. Then just randomly stuck them to the candles.

Since the candles I used are real wax the vinyl is easy to peel back off again so you can change them out for the next season or holiday. I am thinking about doing snowflakes for winter and using StyleTechCraft White Opal Vinyl. The opal vinyl would be perfect for snowflakes.


Interested in the products I used? Products that are still available are linked to multiple shops below, for your convenience.
Lists may contain affiliate links where possible at no cost to you, what so ever. Affiliate and product disclosure can be found here.
I design for several companies because I genuinely love their products! Anything I recommend on my blog is something that I genuinely love and regularly use. I buy most of my own supplies. However, I do receive some free products to work with, and I sometimes make money for the projects I make. I DO NOT get paid for product reviews, I give my honest opinion about the products I use, and I will never recommend a product that I do not like or would not use.

June 7, 2021

Personalized Softball Home Decor Plaque

 Hello! Today I am sharing a personalized softball home decor plaque I made for my daughter to hang up in her room.


Some of the products I have used in this post have been provided to me by various companies. The opinions I share are solely my own. Affiliate links may be used where possible at no cost to you. However, I do earn a small commission when you click on my links and make a purchase from them. Thank you, and I appreciate your support!

This really was not a difficult project to create at all. So easy that I am actually thinking about making one for each of the girls on my daughter's team.
I first started with the Creative Embellishment Baseball Home Decor piece and painted it with some yellow acrylic paint. It did take about 3 coats to cover it well so next time I think I might do a coat of Gesso first. Then for the stitching, I used a Decocolor Red Paint Marker. I painted mine yellow so it would be a softball but it could also be easily painted white with red stitching to be a baseball.


For my daughter's name and number, I used StyleTechCraft Glossy Craft Vinyl in Royal Blue. I cut the letters out using my Silhouette Cameo 4 on the glossy vinyl setting and then used StyleTechCraft Clear Transfer Tape to make sure I got all the letters lined up straight. All I had to do was place the clear tape over the top of the cut glossy vinyl, peel the backing off of the glossy vinyl and then weed out the areas of the glossy vinyl that I did not want. Then just transferred the glossy vinyl to the front of the softball.


Interested in the products I used? Products that are still available are linked to multiple shops below, for your convenience.
Lists may contain affiliate links where possible at no cost to you, what so ever. Affiliate and product disclosure can be found here.
I design for several companies because I genuinely love their products! Anything I recommend on my blog is something that I genuinely love and regularly use. I buy most of my own supplies. However, I do receive some free products to work with, and I sometimes make money for the projects I make. I DO NOT get paid for product reviews, I give my honest opinion about the products I use, and I will never recommend a product that I do not like or would not use.

May 6, 2021

Customized Color Changing Beer Mug For Father's Day

 Have you started thinking about Father's Day yet? I think guys are hard to buy for, there are just so many tools you can get them. So this year I went with a customized beer mug. Not only is it customized, but it also changes colors!


Some of the products I have used in this post have been provided to me by various companies. The opinions I share are solely my own. Affiliate links may be used where possible at no cost to you. However, I do earn a small commission when you click on my links and make a purchase from them. Thank you, and I appreciate your support!

The first thing I did was search google for an image that I liked. Then I went through all of my color-changing vinyl from StyleTechCrafts and decided to use the Cold Blue Vinyl and cut it out using my Silhouette Cameo 4 and Studio Designer Program. After the image was cut out, I used my StyleTechCraft Tools to weed the vinyl and Clear Transfer Tape to transfer the image onto a mug that I got at the Dollar Store.

Before adding anything cold to the mug the vinyl looks almost like it is etched into the glass.

But then when you add a nice cold drink to it, it changes to a cool blue right before your eyes.

Interested in the products I used? Products that are still available are linked to multiple shops below, for your convenience.
Lists may contain affiliate links where possible at no cost to you, what so ever. Affiliate and product disclosure can be found here.
I design for several companies because I genuinely love their products! Anything I recommend on my blog is something that I genuinely love and regularly use. I buy most of my own supplies. However, I do receive some free products to work with, and I sometimes make money for the projects I make. I DO NOT get paid for product reviews, I give my honest opinion about the products I use, and I will never recommend a product that I do not like or would not use.

March 6, 2021

Customized Cell Phone Case with Vinyl

 Have you ever wanted to jazz up your cell phone case? My case was just a plain solid color so I decided to personalize it.

Some of the products I have used in this post have been provided to me by various companies. The opinions I share are solely my own. Affiliate links may be used where possible at no cost to you. However, I do earn a small commission when you click on my links and make a purchase from them. Thank you, and I appreciate your support!

I first searched the internet for an image I liked and found a Mom Softball/Basketball SVG cut file on Etsy. Then using my Silhouette Cameo 4 and Silhouette Studio Designs, I cut out the SVG file using StyleTechCraft Craft Vinyl in Matte Black as the base and then the softball side in Glossy Light Yellow with Glossy Red for the laces. For the basketball side, I used Glossy Orange and since there was black behind it, it darkened up and wasn't as bright orange. To help me line each layer up, I used StyleTechCraft Clear Grid Transfer Tape.


Interested in the products I used? Products that are still available are linked to multiple shops below, for your convenience.
Lists may contain affiliate links where possible at no cost to you, what so ever. Affiliate and product disclosure can be found here.
I design for several companies because I genuinely love their products! Anything I recommend on my blog is something that I genuinely love and regularly use. I buy most of my own supplies. However, I do receive some free products to work with, and I sometimes make money for the projects I make. I DO NOT get paid for product reviews, I give my honest opinion about the products I use, and I will never recommend a product that I do not like or would not use.