Showing posts with label 4th of July. Show all posts

July 4, 2022

Happy 4th Of July Card

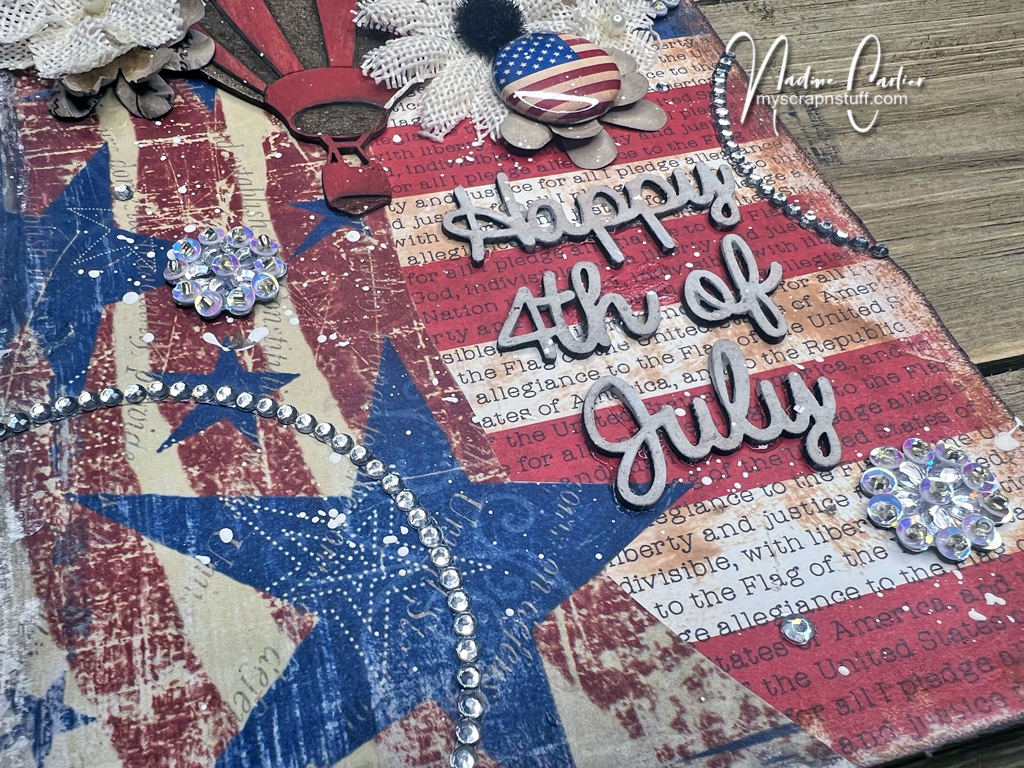
Happy 4th Of July! Thought today was appropriate to share this card I made.

Some of the products I have used in this post have been provided to me by various companies. The opinions I share are solely my own. Affiliate links may be used where possible at no cost to you. However, I do earn a small commission when you click on my link and make a purchase from them. Thank you, and I appreciate your support!

I inked up the Crackerbox Stamps American Flag Artsy with some blue and red ink and then sprayed it with some water before inking it onto my paper. I wanted it to have a watercolor look to it. Once it was dry, I stamped over the flag again with VersaMark and heat embossed it with some sparkle embossing powder.

Then, I randomly stamped the Crackerbox Stamps Fireworks around the flag using VersaMark and sprinkled some red, blue, and gold embossing powder on them, and heat embossed them.
For the sentiment, I stamped the Crackerbox Stamps Happy 4th of July stamp with VersaMark and heat embossed it with red embossing powder. Then I lightly flicked on some blue ink and mounted it to gold glitter cardstock and then to my card base.

Interested in the products I used? Products that are still available are linked to multiple shops below, for your convenience. Lists may contain affiliate links where possible at no cost to you, whatsoever. Affiliate and product disclosure can be found here.
I design for several companies because I genuinely love their products! Anything I recommend on my blog is something that I genuinely love and regularly use. I buy most of my own supplies. However, I do receive some free products to work with, and I sometimes make money for the projects I make. I DO NOT get paid for product reviews, I give my honest opinion about the products I use, and I will never recommend a product that I do not like or would not use.

June 21, 2022

4th of July Mixed Media Tag

It is hard to believe it is almost the 4th of July already. Seems like this year just started. So in honor of the 4th, I decided to create a 4th of July mixed media tag.

I used one of the Large Chipboard Tags from Creative Embellishments and adhered some patterned paper onto it and sanded the edges to distress it a little. Then I painted the hot air balloon from the Creative Embellishments Summer 4th of July Set 2 with a thin layer of blue and red acrylic paint. I also painted one of the Creative Embellishments Fireworks 2 with a thin layer of white acrylic paint.

I adhered the firework and hot air balloon with some flowers to the front of the tag with Xyron Mini Glue Gun. I also added one of the flairs from the Creative Embellishments Vintage Patriotic Flair Set. Lastly, I painted the Happy 4th of July sentiment from the Creative Embellishments Holiday Sentiment Word Set with white acrylic paint.

Interested in the products I used? Products that are still available are linked to multiple shops below, for your convenience. Lists may contain affiliate links where possible at no cost to you, whatsoever. Affiliate and product disclosure can be found here.
I design for several companies because I genuinely love their products! Anything I recommend on my blog is something that I genuinely love and regularly use. I buy most of my own supplies. However, I do receive some free products to work with, and I sometimes make money for the projects I make. I DO NOT get paid for product reviews, I give my honest opinion about the products I use, and I will never recommend a product that I do not like or would not use.

July 9, 2020

A 4th of July Scrapbook Layout Using Chipboard Fireworks

Now that the 4th of July has passed do you have some photos that need to be scrapped? I sure do! I used three photos from this year of the kids enjoying their fireworks.


Some of the products I have used have been provided to me from various companies I design for. The opinions I share are solely my own, and I only design for companies that I completely love their products. Affiliate links may be used where possible at no cost to you. However, I do earn a small commission when you click on my links and make a purchase from them. Thank you, and I appreciate your support!

After layering some patterned papers up, I then used chipboard pieces from the Creative Embellishments Fireworks 2 and Creative Embellishments 4th of July sets and added some VersaMark to them and then heat set them with some Hologram Embossing Powder.


I also used one of the flairs from the Creative Embellishments Watercolor 4th of July Flair set.


In the photo below you can see how pretty the Hologram Embossing Powder is. I love all the sparkly colors it has in it. Perfect for fireworks. I adhered all my paper layers down by using my Xyron Mega Runner.


Interested in the products I used? Products that are still available are linked to multiple shops below, for your convenience.
Lists may contain affiliate links where possible at no cost to you, what so ever. Affiliate and product disclosure can be found here.
I design for several companies because I genuinely love their products! Anything I recommend on my blog is something that I genuinely love and regularly use. I buy most of my own supplies. However, I do receive some free products to work with, and I sometimes make money for the projects I make. I DO NOT get paid for product reviews, I give my honest opinion about the products I use, and I will never recommend a product that I do not like or would not use.

June 4, 2020

4th Of July Cards Using Stencils and Foil


Today I am sharing some 4th of July cards I made. It's hard to believe we are only a month away from July already.  I do not usually send 4th of July cards but I think this year I am going to since we will not be doing the big BBQ get to together like we normally do every year.


Some of the products I have used have been provided to me from various companies I design for. The opinions I share are solely my own, and I only design for companies that I completely love their products. Affiliate links may be used where possible at no cost to you. However, I do earn a small commission when you click on my links and make a purchase from them. Thank you, and I appreciate your support!

I first started with a piece of Watercolor Paper and sprayed it with a light blue color spray.


Next, using The Crafter's Workshop TCW900 Dahlia Trio Stencil with some Pixie Spray sprayed onto the back so it would stick to the watercolor paper. Then I sprayed some color sprays in red, blue, and silver over the stencil. The first time I did this, I did not use the Pixie Spray so I have a lot more bleeding then I wanted. Which you can see with the two finished cards. One you can see how the sprays bled more than the other one did.


Once all the color sprays were dry, I then replaced the stencil over it, and using a palette knife I applied some The Crafter's Workshop Tacky When Dry Gel in an even layer.


When The Crafter's Workshop Tacky When Dry Gel is wet it is white in color but once it is dry it will be clear but tacky.
*Make sure to wash your stencil off right away with soap and warm water before the gel dries on it and also to get the Pixie Spray off.


After letting the gel dry for about 15 minutes and it is no longer white, I then added pieces of  Xyron transfer foil over it in red, blue, and silver. Rubbing over the transfer foil with my fingers so the foil transfers to The Crafter's Workshop Tacky When Dry Gel.


Then I added a stamped sentiment using the Crackerbox & Suzy Stamps Happy 4th of July stamp that I heat embossed with silver embossing powder. 
Even though The Crafter's Workshop TCW900 Dahlia Trio Stencil is flowers they also reminded me of fireworks which is what inspired me for my cards.


Interested in the products I used? Products that are still available are linked to multiple shops below, for your convenience.
Lists may contain affiliate links where possible at no cost to you, what so ever. Affiliate and product disclosure can be found here.
I design for several companies because I genuinely love their products! Anything I recommend on my blog is something that I genuinely love and regularly use. I buy most of my own supplies. However, I do receive some free products to work with, and I sometimes make money for the projects I make. I DO NOT get paid for product reviews, I give my honest opinion about the products I use, and I will never recommend a product that I do not like or would not use.

June 29, 2018

Creating Firework Backgrounds On Cards

Hey, everyone! With 4th of July right around the corner, I wanted to make some 4th of July cards. So I made some with a firework background using Fireworks!


Some of the products I have used have been provided to me from various companies I design for. The opinions I share are solely my own, and I only design for companies that I completely love their products. Affiliate links may be used where possible at no cost to you. However, I do earn a small commission when you click on my links and make a purchase from them. Thank you, and I appreciate your support!

Watch my video tutorial below to see how I created the firework background.
Make sure to subscribe to my YouTube channel so you will get updates when I post a new video.


I love how the Imagine Metallic Silver Embossing Powder pops over the Imagine Fireworks! Spray when using the Joy Clair Stamps Happy 4th stamp set.


Interested in the products I used? Products that are still available are linked to multiple shops below, for your convenience.
Lists may contain affiliate links where possible at no cost to you, what so ever. Affiliate and product disclosure can be found here.
I design for several companies because I genuinely love their products! Anything I recommend on my blog is something that I genuinely love and regularly use. I buy most of my own supplies. However, I do receive some free products to work with, and I sometimes make money for the projects I make. I DO NOT get paid for product reviews, I give my honest opinion about the products I use, and I will never recommend a product that I do not like or would not use.

May 21, 2018

Easy DIY 4th Of July Decoration and Giveaway

Hello again, my crafty friends! Today I am sharing an easy DIY 4th of July decoration and giveaway. Make sure to scroll down to the bottom of my post to find out all the ways you can win a Xyron Mega Runner!


Watch my video tutorial below to see how I created this 4th of July decoration.
Make sure to subscribe to my YouTube channel so you will get updates when I post a new video.


The stars punched out of the Rinea Foiled Paper match perfectly with the Pebbles Land That I Love Collection, don't you agree?


Want to know how you can win a Xyron Mega Runner from Xyron

1. Just follow my blog and comment on this post by midnight May 31st. 
2. For a second entry into the drawing, subscribe and comment on my video (link is above).
One lucky winner (US and Canada Only) will be randomly picked and announced here on this blog post on June 1st. Good luck! :)

The lucky winner is.... SUE D! Please message me your name and mailing address so we can get your Xyron Mega Runner sent out to you asap.

Interested in the products I used? Products are linked to multiple shops below, for your convenience. Lists may contain affiliate links where possible at no cost to you, what so ever. I received some of these products for free but was not compensated for writing this post. Affiliate and product disclosure can be found here.

May 8, 2018

4th of July Scrapbook Layout

Hello! Today I am sharing a 4th of July scrapbook layout I created using American Crafts Pebbles - Land That I Love and Xyron.


Watch my process video below to see how I created my layout and for a preview of the American Crafts Pebbles Inc. - Land That I Love collection.
Make sure to subscribe to my YouTube channel so you will get updates when I post a new video.


Here are some close-ups showing the fireworks I created with DecoArt Paints onto the background and the fun Land That I Love collection.


Interested in the products I used? Products are linked to multiple shops below, for your convenience. Lists may contain affiliate links where possible at no cost to you, what so ever. I received some of these products for free but was not compensated for writing this post. Affiliate and product disclosure can be found here.

July 7, 2016

Photo Transfer On An Acrylic Frame

Looking for an idea on what to do with your pictures from the 4th of July? How about making a photo transfer frame using a printout of a flag and some Decou-Page from DecoArt?


I love these beveled edged 5x7 frames from Deflecto. They are so easy to change out the picture, and they look like real glass. 

Watch the video below to see how I did the photo transfer....


In the close-up photos below you can see all the sparkly glitter from the DecoArt Glamour Dust Ultra Fine Glitter Paint.


*The flag image I printed out was on just plain white copy paper with an ink jet printer. 

Interested in the products I used? To make them easy for you to find, I have listed them below.  Some links used are Affiliated links, which means I receive a small commission (at no additional cost to you, what so ever!!) when you click on my links and make a purchase from their store.  Affiliate and product disclosure can be found here.