Showing posts with label Wedding. Show all posts

October 6, 2021

DIY Wedding Card Money Box

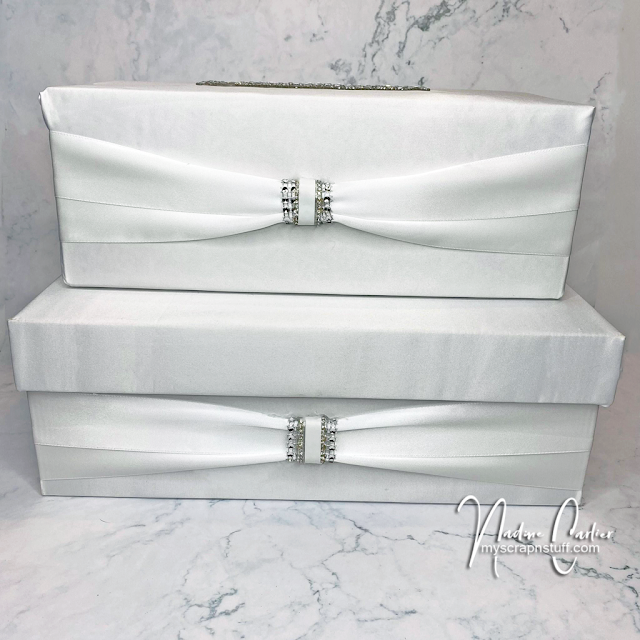
Weddings are super expensive so anything you can make on your own to save money helps. I was looking online and saw customized wedding card money boxes being sold for over a hundred dollars... wait what?!?! So I found some shoe boxes I had around the house and got to work.

Some of the products I have used in this post have been provided to me by various companies. The opinions I share are solely my own. Affiliate links may be used where possible at no cost to you. However, I do earn a small commission when you click on my links and make a purchase from them. Thank you, and I appreciate your support!

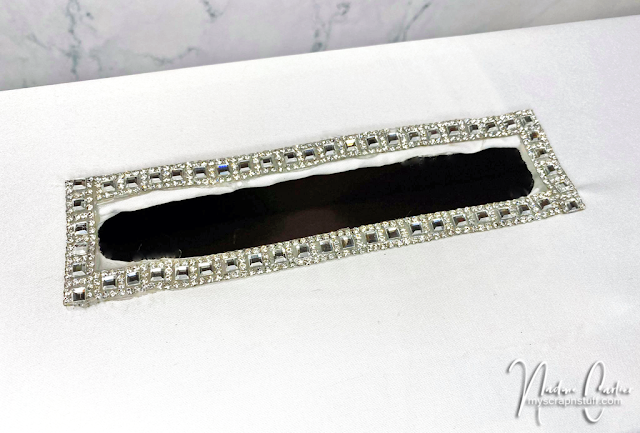
I used two different size shoeboxes and Gwen Studios ribbons and fabrics from Walmart.com. First, I painted both of the shoeboxes with white Gesso to cover up the logos and writing on the boxes so they didn't show through the fabric. Then I cut a large hole in the lid of the largest box but making sure the smaller box on the top would still cover the hole and cut a mail size slot in the top of the smaller box. Then using Gwen Studios White Satin Fabric I wrapped the boxes just like I was using wrapping paper and used the Xyron Mini Multi-Stick Glue Gun to adhere the fabric to the boxes.

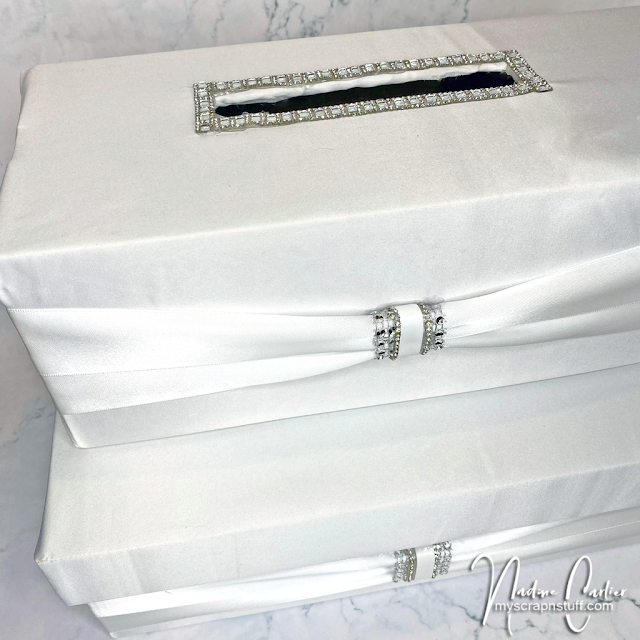
Next, I cut two pieces of the Gwen Studios White Silk Satin Ribbon in the 1.5" and wrapped them both around the boxes side by side but slightly overlapping one another and adhering them to the back of the boxes.

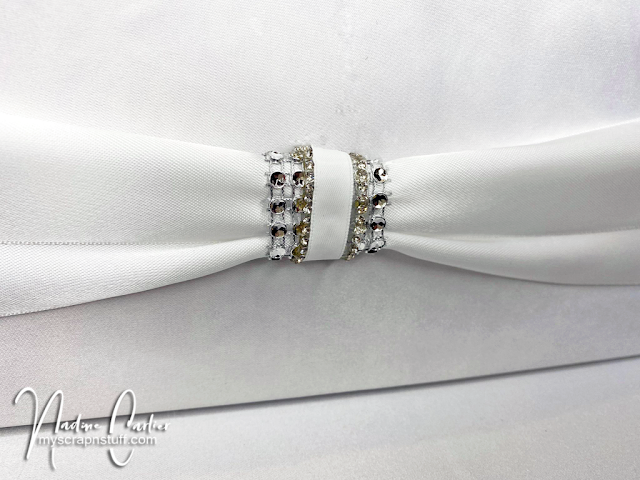
Then pinching the two satin ribbons together on the front center and wrapping two small pieces of two of the 3 styles from the Gwen Studios White Satin and Rhinestone Trim around the pinched area and added some hot glue to the back to adhere in place.


Lastly, I used the third style from the Gwen Studios White Satin and Rhinestone Trim and bordered it around the mail slot on the top with the Xyron Mini Multi-Stick Glue Gun. I think it turned out pretty good, what do you think? Plus it cost NOWHERE near a hundred dollars, bonus!


For more DIY wedding ideas head on over to the Designer Crafts Connection blog post HERE for more inspiration using Gwen Studios ribbons & fabrics.

Interested in the products I used? Products that are still available are linked to multiple shops below, for your convenience.
Lists may contain affiliate links where possible at no cost to you, what so ever. Affiliate and product disclosure can be found here.
I design for several companies because I genuinely love their products! Anything I recommend on my blog is something that I genuinely love and regularly use. I buy most of my own supplies. However, I do receive some free products to work with, and I sometimes make money for the projects I make. I DO NOT get paid for product reviews, I give my honest opinion about the products I use, and I will never recommend a product that I do not like or would not use.

June 6, 2020

Simple & Elegant Wedding Card


Hello! Today I am sharing a simple and elegant wedding card. Sometimes simple is more!


Some of the products I have used have been provided to me from various companies I design for. The opinions I share are solely my own, and I only design for companies that I completely love their products. Affiliate links may be used where possible at no cost to you. However, I do earn a small commission when you click on my links and make a purchase from them. Thank you, and I appreciate your support!

I first stamped the Crackerbox & Suzy Stamps Bride and Groom stamp and the Crackerbox & Suzy Stamps Forever and Always stamp with VersaMark and heat embossed it with some Iridescent Opaque Embossing Powder.


Then around the outer top edges, I stamped the swirly vail part of the Crackerbox & Suzy Stamps Bride and Groom stamp with VersaMark and heat embossed it with some Iridescent Embossing Powder. Then using a sponge dauber and Delicata White Shimmer Ink, I blended it around the outside edges.


I created a very similar card like this one a few years ago, below is the video tutorial of how I did it.


Don't forget to visit the Crackerbox & Suzy Stamps Store and check out all of the stamps that are 20% OFF this month. All the stamps I used on my card are on sale the entire month of June.
Just add them into your cart and you will then see the discount on the stamps once they are in your cart.


Interested in the products I used? Products that are still available are linked to multiple shops below, for your convenience.
Lists may contain affiliate links where possible at no cost to you, what so ever. Affiliate and product disclosure can be found here.
I design for several companies because I genuinely love their products! Anything I recommend on my blog is something that I genuinely love and regularly use. I buy most of my own supplies. However, I do receive some free products to work with, and I sometimes make money for the projects I make. I DO NOT get paid for product reviews, I give my honest opinion about the products I use, and I will never recommend a product that I do not like or would not use.

March 1, 2020

A Pretty Wedding Tag Shaker Card With Video Tutorial

Hello! I needed a wedding card so I thought why not make my own and why not make a pretty wedding tag shaker card that can be hung as a decoration on a gift. Here is what I came up with...


Some of the products I have used have been provided to me from various companies I design for. The opinions I share are solely my own, and I only design for companies that I completely love their products.
Affiliate links may be used where possible at no cost to you. However, I do earn a small commission when you click on my links and make a purchase from them. Thank you, and I appreciate your support!

Below is a video tutorial showing exactly how I created my project.
Make sure to subscribe to my YouTube channel and click the bell so you will get updates when I post a new video.


The Maker's Movement In Full Bloom Stamp & Die Set has a fabulous flower die that I used to make the pretty roses on my card. I cut them out from some Rinea Silver Glossy Foiled Paper and then just rolled them up. I show exactly how I made them in my video tutorial above.


The vase die that is in the Maker's Movement In Full Bloom Stamp & Die Set make a great shaker shape as you can see below. The title that comes in this die set is the word "bloom" and used with the stamp that says "Love Is In" makes a great sentiment for a wedding card.


The patterned paper I used is from DCWV and is called Happy Spring Paper Pad. Even though the paper pad is for spring the metallic that is on some of the sheets I thought was perfect for a wedding.


Interested in the products I used? Products that are still available are linked to multiple shops below, for your convenience.
Lists may contain affiliate links where possible at no cost to you, what so ever. Affiliate and product disclosure can be found here.
I design for several companies because I genuinely love their products! Anything I recommend on my blog is something that I genuinely love and regularly use. I buy most of my own supplies. However, I do receive some free products to work with, and I sometimes make money for the projects I make. I DO NOT get paid for product reviews, I give my honest opinion about the products I use, and I will never recommend a product that I do not like or would not use.

May 9, 2019

Easy DIY Wedding Favor Gift Boxes

Hello, everyone! Sometimes you want to leave your guests a little something as a thank you for attending your wedding or special event. These DIY wedding favor gift boxes are super easy to make. They can be made in many different sizes and colors to fit your style and needs. They would also be great for party favors for a baby shower too.


These gift boxes would go perfectly with the wedding card invites I created, visit my blog post HERE for more information on those.

Below is a video tutorial showing exactly how I created these pretty favor boxes.
Make sure to subscribe to my YouTube channel and click the bell so you will get updates when I post a new video.


Some close-up photos on the details on the favor boxes....


Interested in the products I used? Products are linked to multiple shops below, for your convenience.
Lists may contain affiliate links where possible at no cost to you, what so ever. Affiliate and product disclosure can be found here.
I design for several companies because I truly love their products! Anything I recommend on my blog is something that I genuinely love and regularly use. I buy most of my own supplies. However, I do receive some free product to work with and I sometimes make money for the projects I make. I DO NOT get paid for product reviews, I give my honest opinion about the products I use and I will never recommend a product that I do not like or would not use.

April 26, 2019

How To Make Elegant Wedding Invitations

Hello there! Today I have some elegant wedding invitations I made using inks from Imagine. Weddings can be expensive and the invitations are no exception to that. Making them yourself can save you a lot of money.


Below is a video tutorial showing exactly how I created these elegant wedding invites. The video also shows how and what products I used.
Make sure to subscribe to my YouTube channel and click the bell so you will get updates when I post a new video.


Some close up photos showing the gorgeous details on the invites and response cards. I also created matching envelopes.


Interested in the products I used? Products are linked to multiple shops below, for your convenience.
Lists may contain affiliate links where possible at no cost to you, what so ever. Affiliate and product disclosure can be found here.
I design for several companies because I truly love their products! Anything I recommend on my blog is something that I genuinely love and regularly use. I buy most of my own supplies. However, I do receive some free product to work with and I sometimes make money for the projects I make. I DO NOT get paid for product reviews, I give my honest opinion about the products I use and I will never recommend a product that I do not like or would not use.

March 15, 2018

Create A Wedding Card by Stamping On Acetate

Hello, everyone! Today I am sharing a wedding card I made by stamping on acetate.
Have you ever tried to stamp onto plastic or acetate? Normally it takes close to never to dry and if you do finally get it to dry it will still smear ruining what you just stamped. Not if you use StazOn ink! I used a Brutus Monroe background stamp with some Cotton White Opaque StazOn Ink to create this pretty wedding card.


Watch my tutorial video below to see exactly how I created my card.
Make sure to subscribe to my YouTube channel so you will get updates when I post a new video.


Just so you can see how perfectly the StazOn stamps on acetate or slick surfaces like acetate here are some close-up photos.


Interested in the products I used? Products are linked to multiple shops below, for your convenience. Lists may contain affiliate links where possible at no cost to you, what so ever. I received some of these products for free but was not compensated for writing this post. Affiliate and product disclosure can be found here.

July 2, 2017

Easy Black & White Wedding Card

Hello! Today I have an easy black & white wedding card using some of the new Brutus Monroe June release stamps.


On the background, I stamped the new Brutus Monroe Heart Lace Background stamp with Brutus Monroe Embossing Ink onto a piece of flourish tissue paper from the Brutus Monroe Butterfly Garden Paper Pad and then embossed it with some Brutus Monroe Alabaster Embossing Powder.


For the darling couple, I used the Brutus Monroe Grow With Me Stamp set and stamped with some Brutus Monroe Raven Detail Ink. For the sentiment, I used the Mr. & Mrs. stamp from the Brutus Monroe Rose Border Stamp Set.


Interested in the products I used? Product links to multiple shops are below, for your convenience. Lists may contain affiliate links where possible at no cost to you, what so ever. Affiliate and product disclosure can be found here.


February 14, 2017

Just Married Card

Happy Valentine's Day!
I thought today was a perfect day to share this Just Married card I made for Brutus Monroe. The adorable wedding couple stamp will be released on Feb. 17th. 


I colored the couple in with Copic markers and die cut them out with Spellbinders Oval dies, then adhered it over a pink doily. The patterned papers I used are from Maja Designs. I distressed the edges of the papers and ink them up with Brutus Monroe Macchiato Surface Ink.


I used another die from Spellbinders, Hearts A Flutter at the bottom of the card and then I airbrushed it with Copic markers. Made a little banner and stamped a sentiment from the Brutus Monroe stamps set. 


Interested in the products I used? To make them easy for you to find, I have listed them below. Some of the links used are affiliated links, which means I receive a small commission (at no additional cost to you, what so ever!!) when you click on my links and make a purchase from their store. Affiliate and product disclosure can be found here. This project was created for and sponsored by Brutus Monroe.